Plancs are only suitable for indoor, domestic use. Do not use outdoors, in cabins, caravans or vehicle garages.
Do not use on walls.
Check for any visual defects or damage before and during installation. Plancs Flooring will not be responsible for installation cost claims where flooring was installed with obvious defects.
Subfloors must be perfectly dry, smooth, level, structurally sound, clean and dust free.
Installation temperature should be between 18°C to 28°C, ideally at a room temperature of 22°C.
Protect your floor from excessive direct heat, significant temperature variation or direct sunlight, using curtains, blinds and temperature controls.
Not recommended for areas where the temperature regularly falls below 12°C or over 30°C.
Do not apply to loose or uneven subfloor, or heavily textured flooring.
Do not apply over radiant heated floors.
Do not use additional adhesives.
Do not apply over concrete with excessive moisture or alkalinity.
INSTALLATION
Please read all installation instructions carefully before installing or cutting Plancs Flooring.
You will need:
- A water-based floor or latex primer (recommended)
- Roller or broom to apply primer (recommended)
- Tape measure
- A straight edge (E.g. metal ruler)
- Utility knife/ Stanley knife
- Pencil
- Floor roller or hand roller (45kg/ 100lb recommended)
Before Installation:
Place Plancs on a flat surface and allow them to acclimatize for 48 hours to room temperature of at least 18°C before installation.
Suitable subfloors include concrete, timber, and ceramic tiles. Check that the subfloor is perfectly dry, smooth, level, structurally sound, clean and dust free. Do not install on asphalt, bituminous surfaces or over existing floor coverings (excluding ceramic tiles).
For best adhesion, all surfaces must be primed. We recommend using a diluted solution of a water-based floor or latex primer – carefully follow manufacturer’s instructions and recommendations.
Once the floor has been primed, inspect for any dirt or dust, and vacuum clean as required. Then you are ready to begin.
Plan Your Space:
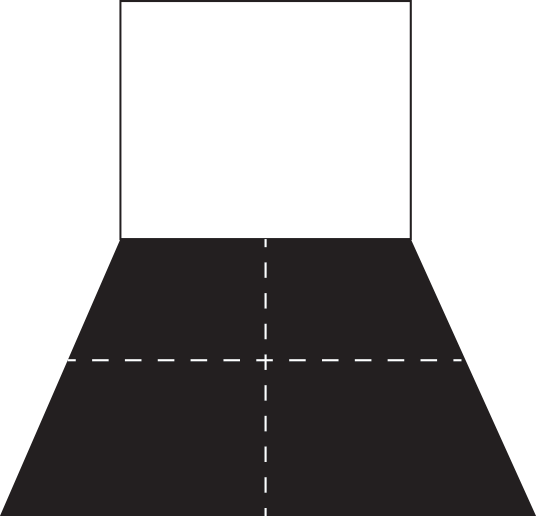
Carefully measure your floor space and divide the room into 4 sections by drawing 2 perpendicular lines from wall to wall, across the floor and use these as your guide to ensure you are laying the Plancs perfectly square.
For Square Plancs:
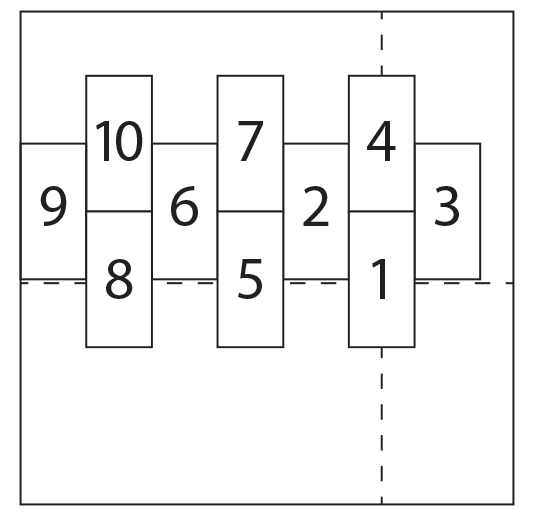
We recommend that when laying Plancs, you start from the middle of the room and complete each quarter section one at a time. For best results lay in a staggered pattern as pictured.

For Rectangle Plancs:
Use the cross in the centre of the room to line up with the centre of your first Planc. Use the perpendicular lines as guides to start the ‘brick pattern’ of your next Plancs.
Laying Plancs:
Leave backing paper on and lay out all Plancs from the centre of the room before adhesion to ensure you are happy with the overall result. Patterned tiles may have a slight design variation from tile to tile, this will not affect the overall look. Be sure to rotate tiles to find best pattern match and layout.
Once you are happy, start again from the centre, peel the backing paper from a Planc and CAREFULLY place at the centre point, lining up with your marked lines. Check that it is correctly positioned and then apply firm all-over pressure to ensure complete contact.
Lay each quarter of the room separately, making sure the Plancs are a close fit but do not force them together.
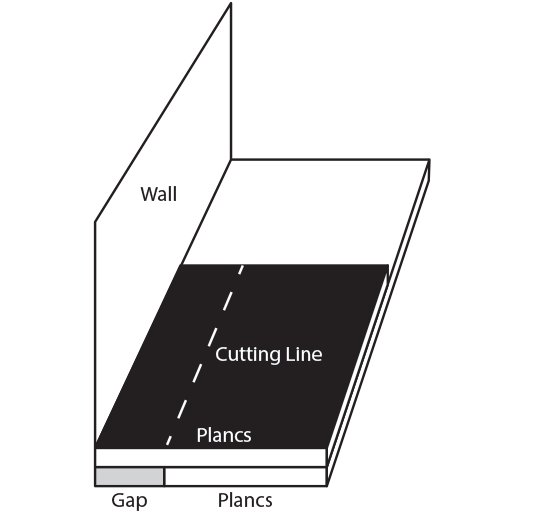
Leave a 1 mm gap around the perimeter of the room.
We recommend rolling the new flooring with a 45kg/ 100lb roller or hand roller to ensure maximum bond strength. Avoid touching the adhesive – dust, dirt and oils will affect its strength.
Warning: The backing paper on this product is slippery, once removed, dispose of immediately.
Cutting Plancs:
To complete your project you will likely need to cut a few Plancs to finish off any gaps you may have around the edges. Leaving the backing paper on, lay the Planc you wish to cut over the last full fixed Planc, and press lightly against the wall. Mark a cutting line with a Utility Knife where the Plancs overlap.
Shaped Cuts:
To fit around doorframes, pipes etc., make a cardboard template as a guide and use this to draw an outline onto the Planc. Cut to shape and check that it fits before peeling the backing paper and sticking down.
Finishing:
When you have finished laying, go over the floor once again to check that all Plancs are firmly stuck down.
Do not wash the floor for 5 days.
It is recommended that base/ skirting boards are lifted and reinstalled over the new flooring to allow room for expansion. If Plancs are laid snug against the wall, the pressure caused by expansion can cause them to lift.
Maintenance & Cleaning:
For general cleaning we recommend a damp mop using a mild neutral detergent or vinyl floor cleaner. Never use abrasive pads or cleaners, strong alkaline detergents, ammonia, chlorine detergents or undiluted bleaches. Always wipe spills away immediately with a damp cloth or sponge. Do not let liquids sit on Plancs for a long period of time. Sweep, vacuum, and/or dust as desired.
Replacing Plancs:
Starting from the outside in, cut the Planc diagonally from corner to corner. Gently warm the Planc using a hairdryer and then using a blunt knife simply peel away. Clean subfloor, reprime and install replacement Planc.
